In an ideal world, I could create all the settings I like, hand it off to another parent if I can’t be there to film, and everything would come out great. But there are too many variables and too many ‘what ifs’ that would leave them frustrated and worse, me without any footage to edit. There are some pretty foolproof settings that will almost guarantee a recording, but my goal is to get the highest quality without the camera self-destructing! On the flip side, sometimes I have to remind myself that recording something is better than getting nothing no matter the quality. All this starts with preparing the micro SD card(s) to accept the footage. Then it’s about the proper settings on the camera itself and using the GoPro phone software to keep track of how the recordings are going. Next up us editing the footage, saving the footage, and uploaded to share with the world.
Micro SD Card
You need a quality card. Older cards tend to run hotter than newer ones and newer runs record faster and more efficiently than older ones. No matter what card you buy the first thing you need to do is download an app called SD Card Formatter. This app is free and comes from the SD Association (who knew?) and it gets your card ready to go. Trust me on this one. I had a brand new 256GB card that I took from the package directly to the camera and all I did was go through the cameras settings to format the card. I recorded a couple games then dumped them and put the card back in the camera and hit ‘format SD card’. One weekend during game 2 it just quit recording on me (which I didn’t know until it was too late) but the card was so fragmented from all the recording and dumping and reformatting that the camera saw my 256GB card as only being a 64GB card. At least that’s the way I understand it after reading dozens of articles on memory cards. I don’t know all the technical reasons for what actually went on, but once I ran all my cards through that formatter, I have not had a single problem with card failure since. Once you run these cards through the formatter program, put them in the camera and turn it on. Swipe down with your finger from the top of the touch screen and that will bring up the menu. Select preferences and scroll down to the bottom to find the ‘reset’. Select that and choose ‘format SD card’. Now, the card is ready to record. Because of this trial and error with multiple cards of different brands and sizes I now just record one game per card so instead of using the 256GB card on Saturday to record 2 games, I record one game each on two different 128GB cards. Is this overkill? Maybe. But better safe than sorry because once you miss the game, it’s gone forever. It also helps keep things organized. Each card has files for only one game. To hold all these cards I use a Swiss Army Style Holder that keeps up to 8 micro SD cards secure.
GoPro onboard software
You can really get into the weeds and make the audio and video raw and the highest quality but that will require a lot of time and energy on the backend just to achieve the same result. Let’s face it, we’re not Scorsese or Spielberg here making a blockbuster film. We are just parents who want to record our kids playing the game they love and hopefully grab some sweet hits or plays to share with friends and family. It doesn’t have to be complicated. From the home screen I have set 3 different camera settings based on the weather and temperature. I always try to record in the highest quality possible for multiple reasons. For starters it just looks amazing. YouTube is readily available on all types of screens now. 4K televisions, high def screens on phones and tablets, 5K computer monitors. I want the best quality possible out there for people to watch. And for the most part, everyone has access to high speed internet either in their house, at work, or their wireless provider. The reasons for making low quality to distribute are become less and less. Another benefit is I can zoom in closer from the backstop on the action and it will still look good. I can also zoom in further on certain parts of the field. If I want to zoom in on that play at 3rd base I can zoom right in and the quality will still be fine. Not MLB fine, but 10U baseball fine.
2.7K 60fps
Lens -Wide*
HyperSmooth – Off
Low Light – Off
Zoom – 1.0x
Clips – Off
Bit Rate – Standard
Shutter – Auto
EV Comp – 0
White Balance – Auto
ISO – 100-1600
Sharpness – High
Color – GoPro***
Raw Audio – Off
Wind – Auto
Mics – Stereo
Shortcuts – up to you.
4K 30fps
Lens -Wide*
HyperSmooth – Off
Low Light – N/A
Zoom – 1.0x
Clips – Off
Bit Rate – Standard
Shutter – Auto
EV Comp – 0
White Balance – Auto
ISO – 100-1600
Sharpness – High
Color – GoPro***
Raw Audio – Off
Wind – Auto
Mics – Stereo
Shortcuts – up to you.
1080P 60fps
Lens -Wide*
HyperSmooth – Off
Low Light – N/A
Zoom – 1.0x
Clips – Off
Bit Rate – Standard
Shutter – Auto
EV Comp – 0
White Balance – Auto
ISO – 100-1600
Sharpness – High
Color – GoPro***
Raw Audio – Off
Wind – Auto
Mics – Stereo
Shortcuts – up to you.
* I like setting the lens to wide to capture from dugout to dugout. I can always crop down in post if needed but if there’s a good play in foul territory I want to get it.
*** I like the color set to GoPro. I’ve set to raw and tried to correct it in post but the color looks fine letting the camera handle it and it saves a ton of time on the backend.
2.7K @ 60 fps
This setting is my default for all weather types. I have successfully run this resolution and frame rate up to 95 F ambient temperature using cooling fans. It’s still good enough to zoom in with and not so labor intensive that the camera will fail. The quality is right between 1080P and 4K. And at 60 frames per second, it allows for slow motion instant replay. The difference in this and 4K on YouTube is unrecognizable.
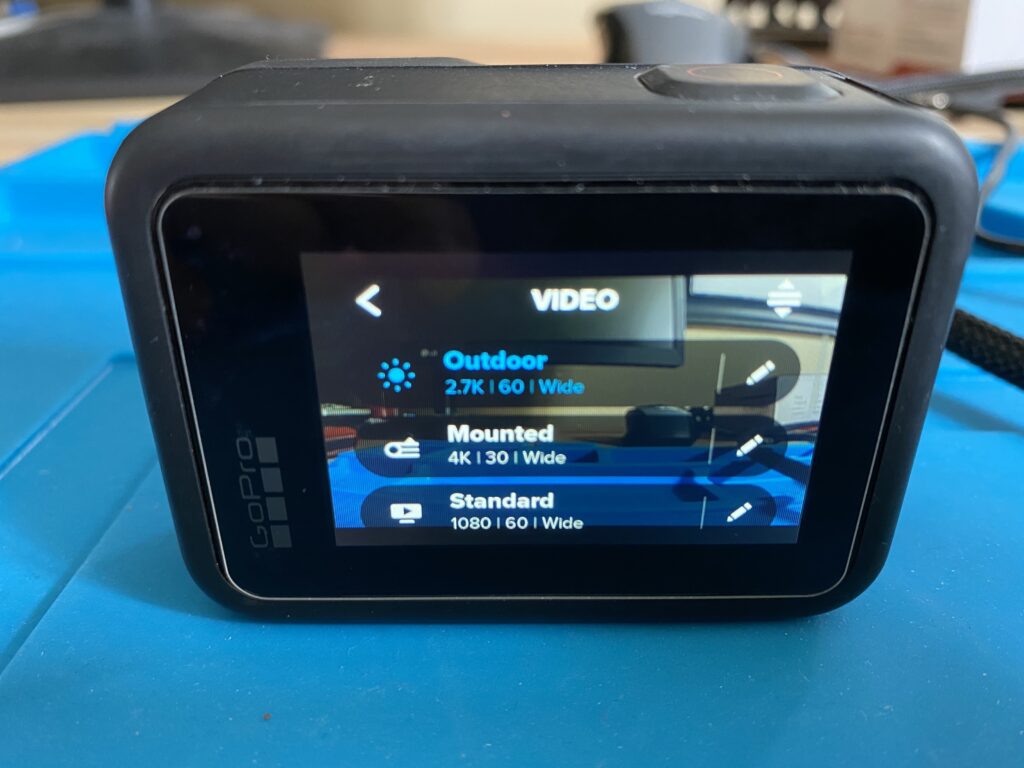
4K @ 30 fps
This is the highest quality the camera can do and it looks amazing. It can actually do 60fps here but I don’t find that to change much. I have been successful at this rate when it’s under 75 F outside using the cooling fans. Recording in 4K and exporting out to 1080P will look better than a video recorded natively in 1080P. But if you’re recording in such high quality, why not just keep it that high of quality!
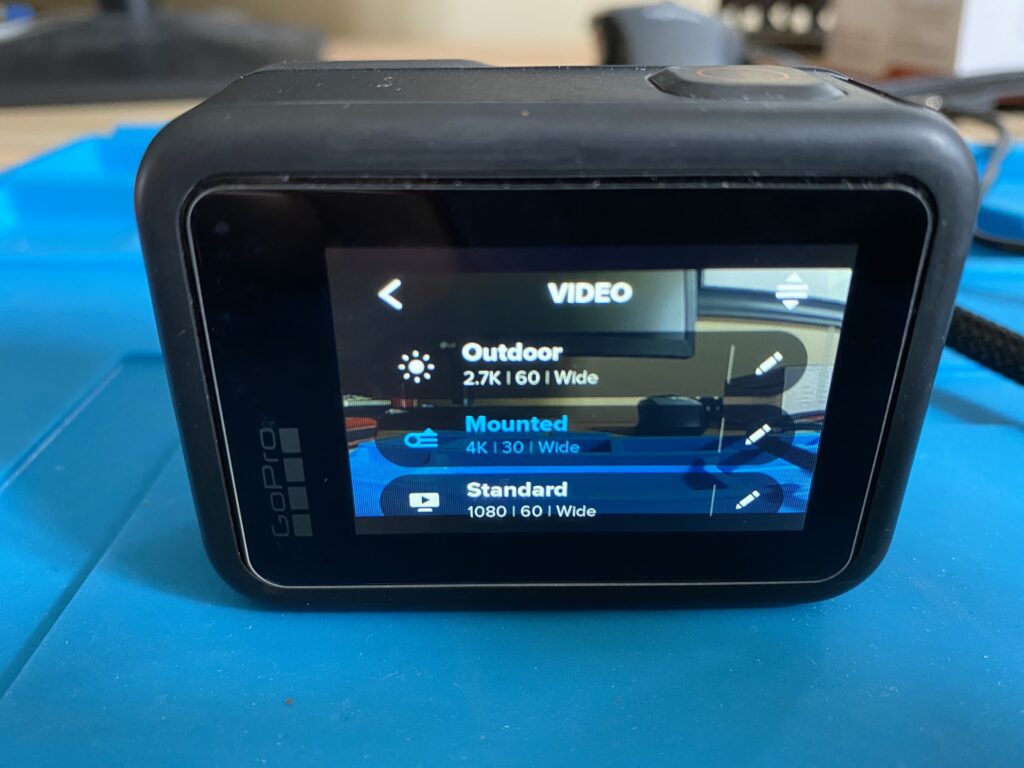
1080p @ 60 fps
This is the absolute lowest quality I will record at. If the weather was closing in on 100 F and in direct sunlight I would choose this to ensure it records. If I was to hand another parent the camera for the day I would set it at this rate and tell them to turn it on, hang it up, and just turn it off at the end. No fussing around and almost 100% guaranteed to capture the game with no issues.

Phone app Software
The GoPro app for your smartphone is critical IMHO to the entire success of recording. I mention turning off WiFi to reduce the heat generated by the camera. But that makes it difficult to know what’s going on up there when you’re behind the dugout or chasing the rest of the family around. Plus, on those really really hot and humid days I like to use the app to stop recording between innings to give the camera a breather. It also helps when editing the video together because you don’t have to cut and merge so many points in the timeline.
Computer Software
There is no right or wrong way at this point. I’ll just give a brief rundown of what has worked for me and hopefully in the future I can give further guidance in a series of blog posts.
First things first. You have a memory card full of 4GB files of baseball games. Why are they 4GB? Because the camera splits the files into 4GB sections. For high def recording that’s about 9 minutes of game play. For a 75-120 minute game, expect at least 12 files and 40GB+ of data. You can just plug the camera directly into the computer and export the files directly into your editing software but I feel like that’s not the best way. My workflow consists of removing the card from the camera and plugging it directly into the computer with a card reader. I have one 5TB external hard drive that I dump all the files to. From there, I have another 5TB external hard drive that I use as my video editing software library (either iMovie or Final Cut Pro X). There is a 3-2-1 rule in the nerd world when dealing with digital media. Nothing is truly saved until it’s saved 3 times in 2 different formats with 1 being offsite. While that sounds extreme, why spend all this time and effort trying to record these games only to lose the footage because a hard drive crashes, gets dropped, corrupted, or worse. Long story short, when I’m done with my workflow I have the original footage from the camera on one hard drive, the final game stitched and edited on a second hard drive, and one copy uploaded to YouTube. -3 copies -2 formats -1 offsite.
Note: I just upgraded to using Final Cut Pro X to do all video editing. It has been a game changer over iMovie. From workflow, to editing, to how it handles media, it’s incredible. If you have a Windows PC I have no clue how to edit video and I apologize, this is the end of our time together. But if you have a Mac, read on.
Once Final Cut or iMovie is open and you go to import the files from the external hard drive it’s pretty imperative that you sort the files by date created and not by name. This is especially true when using the app or remote to stop recording between innings or when there’s a pitcher change. GoPro has a naming convention that is kinda odd so if you sort by file name then drag and drop them into your timeline they will be out of order. I learned that the hard way when a parent was watching their kid pitch and asked me how his kid went from a right handed batter to a left handed batter in the same series? oops. The other thing here is I like to crop the original video to just behind the home plate umpire. This is where it’s really noticeable just what quality the video was shot in. The higher the resolution, the more you can crop and it still look amazing. Since some backstops are further away than others, it takes more cropping to achieve a uniform look that my videos have. I personally don’t like to zoom in with the camera but that’s always an option. I would rather crop on the backend in the Final Cut workflow. I won’t get into audio here because it probably needs it’s own blog post.
Sharing Digitally
Create a YouTube channel for your club and just post.
Nothing complicated here. If you want these videos just for your coaches, there’s ways to limit who can see and search for them. If you want to put them out to the world, you can do that as well. We share one account with multiple age groups over many seasons so playlists become important. And when you create playlists it allows fans to drill down and just subscribe to individual playlists so when the older or younger teams upload a game, it doesn’t notify everyone, just the people subscribed. I also like to break up the Fall and Spring games into separate playlists and I like to put the date of the game in the title since we tend to play the same teams over and over again.
Once YouTube accepts the video after upload they start their process of rendering and formatting it. The video is not available right away. They also encode it in different qualities for you. But that means the larger the file the longer it takes for YouTube to do its thing. A typical 75 minute game (which is with all the breaks cut out) in 4K is about 30GB and takes usually 12 hours for YouTube to make the HD version available to stream. I like to upload the file and make the ‘release’ of the file 12 hours later. Once the SD version (360p) is up, people with notifications set will get alerted a game is up and they’ll see a crap version of what you just spent hours creating. But if I upload it and schedule it as a future release that will give YouTube’s servers time to make the 4K version available before subscribers get notified. Saves a lot of unnecessary text messages asking why the quality is so bad.